
There’s a particular kind of frustration that comes from watching a video buffer in your own bedroom, twenty feet from a router that’s supposedly broadcasting a strong connection. You check your phone. Two bars. You walk to the kitchen. Full bars. Nothing about your internet plan changed between those two rooms, so what did?
If you’ve spent any time trying to figure out how to improve wifi signal in your house, you’ve probably already tried the obvious stuff: restarting the router, standing closer to it. This guide skips the vague advice and walks through what actually moves the needle, in order of effort, starting with fixes that cost nothing.
The fastest ways to improve Wi-Fi signal are repositioning your router to a central, elevated spot, switching to a less congested channel, reducing physical obstructions like walls and metal appliances, and updating your router’s firmware. If those don’t solve it, a mesh Wi-Fi system usually fixes coverage problems that a single router can’t.
Why Your Wi-Fi Signal Is Weak in the First Place
Before jumping into fixes, it helps to understand what’s actually degrading your signal, because the right solution depends on the cause.
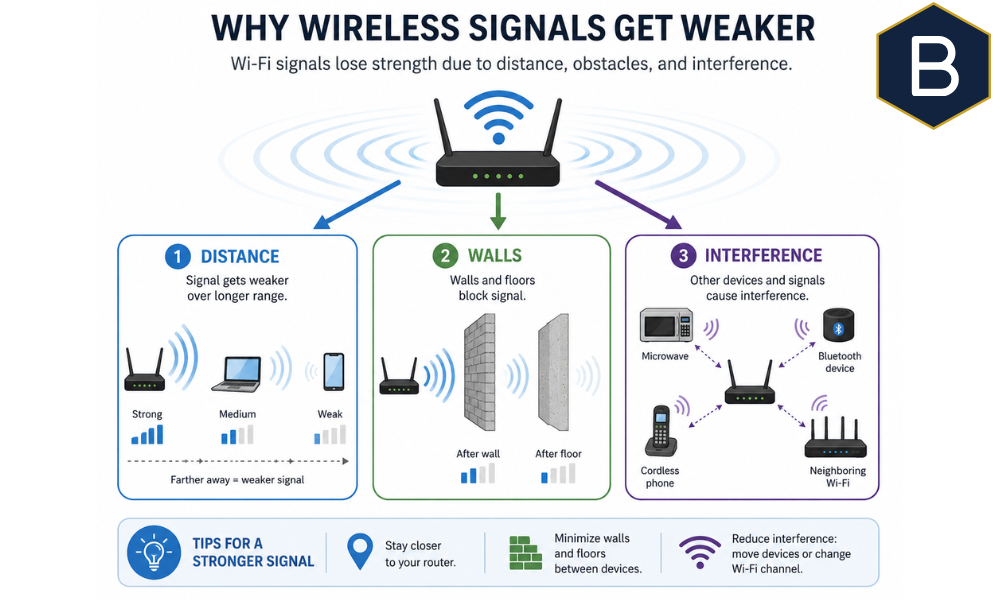
A Wi-Fi signal weakens for a handful of predictable reasons:
- Distance from the router. Signal strength drops the farther you get from the access point, and it fades faster than most people expect once you’re two or three rooms away.
- Physical obstructions. Walls, floors, and furniture all absorb or reflect radio waves. Dense materials like concrete, brick, and plaster block far more signal than drywall or wood ever will.
- Interference from other devices. Microwaves, cordless phones, and baby monitors operate on frequencies close enough to Wi-Fi to cause noticeable disruption, particularly on the 2.4GHz band.
- Channel congestion. In apartment buildings or dense neighborhoods, dozens of networks compete for the same limited channels, similar to trying to have a conversation in a crowded room where everyone’s talking at once.
- Outdated hardware or firmware. A router that’s five or six years old simply wasn’t built for how many devices the average household now connects.
Signal strength and internet speed are not the same thing. You can have a strong signal and still get slow speeds if your ISP plan is the bottleneck, and a fast plan can feel sluggish in certain rooms purely because the signal itself is weak. Knowing which one you’re dealing with saves you from throwing money at the wrong problem.
1. Reposition Your Router (Free, and the Biggest Single Fix)
Router placement is the one thing almost everyone gets wrong, and it’s also the fix with the best return for zero dollars spent. Wi-Fi signals radiate outward and downward from the antenna, so a router tucked on the floor behind the TV console is fighting gravity and furniture at once. Elevating it to chest height or higher, in a central location, typically produces a noticeable improvement within minutes.
A few placement rules worth following:
- Keep it away from metal cabinets, mirrors, and large appliances, which reflect signal unpredictably
- Avoid corners; a central spot lets the signal spread evenly in all directions instead of concentrating it toward one side of the house
- Skip closets and cabinets entirely, even ventilated ones, since enclosed spaces trap and weaken the signal
- If your router has external antennas, angle them vertically for broader horizontal coverage, which is how most homes are laid out anyway
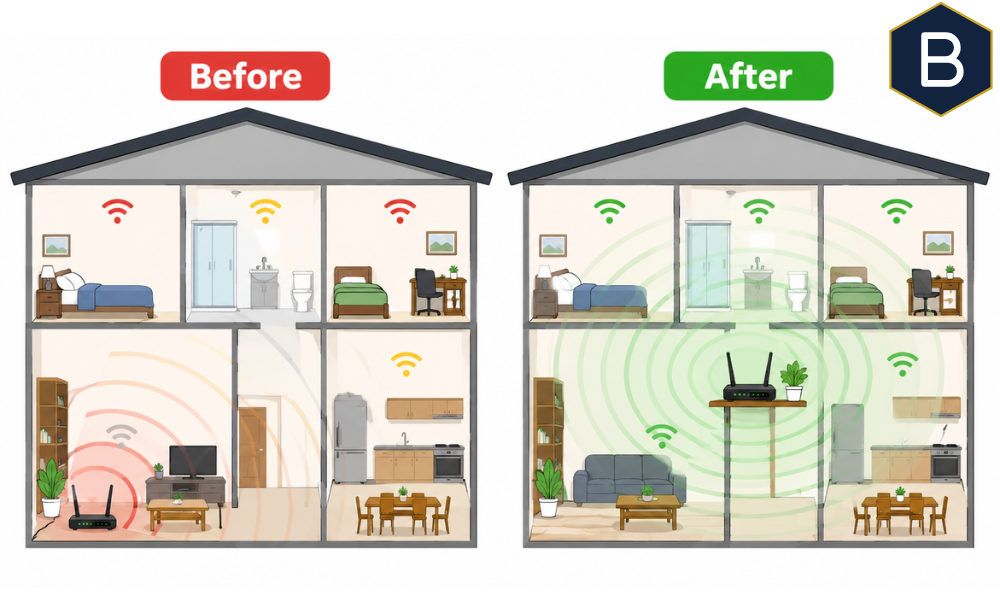
I tested this exact fix in a two-story rental where the router sat in a first-floor closet. Moving it to an open shelf in the hallway, roughly equidistant from both floors, turned a dead zone in the upstairs office into a fully usable workspace. No new hardware, just a different shelf.
2. Switch to a Less Congested Wi-Fi Channel
If you live in an apartment building or a neighborhood with houses close together, your router isn’t just fighting your own walls, it’s competing with every other network in range for the same slice of radio spectrum.
Most routers default to automatic channel selection, but cheaper or older models sometimes lock onto a busy channel and stay there. On the 2.4GHz band, channels 1, 6, and 11 are the only ones that don’t overlap, so sticking to one of those three avoids a lot of unnecessary interference. The 5GHz band has more channel options and generally suffers less congestion to begin with. A free Wi-Fi analyzer app on your phone shows which channels nearby networks are using, turning the choice into elimination rather than guesswork.
3. Reduce Interference From Household Devices
It sounds almost too simple, but plenty of “mystery” Wi-Fi dead zones trace back to a microwave, baby monitor, or old cordless phone sitting a few feet from the router. These devices often operate in the same frequency range as the 2.4GHz Wi-Fi band, and when active, they create noise the router has to fight through. Keep the router at least a few feet away from these appliances, or move the appliance if the router can’t be relocated.
4. Update Your Router’s Firmware
Firmware updates aren’t just security patches. Manufacturers regularly tweak how the router manages bandwidth, handles multiple connected devices, and negotiates channel selection, and those improvements only reach you once installed. Most modern routers check for updates automatically through a companion app, but older models may require logging into the router’s web interface manually. Worth checking every few months, especially if performance has been degrading gradually rather than all at once.
5. Switch Between 2.4GHz and 5GHz (or Use Both Strategically)
If your router is dual-band, you’re not stuck picking one frequency for the whole house. The two bands genuinely behave differently, and understanding that difference lets you use each one where it’s actually strongest.
| Factor | 2.4GHz | 5GHz |
| Range | Longer, penetrates walls better | Shorter, weaker through obstacles |
| Speed | Slower | Significantly faster |
| Interference | More, shared with many household devices | Less, fewer devices use this band |
| Best for | Devices farther from the router (smart plugs, printers) | Devices near the router needing speed (laptops, streaming boxes, gaming consoles) |
A practical approach: put bandwidth-heavy, nearby devices on 5GHz, and let farther-away or low-priority devices (thermostats, smart bulbs, security cameras) sit on 2.4GHz where the range advantage matters more than raw speed.
6. Limit the Number of Connected Devices
Every device connected to your network, whether actively streaming or just sitting idle, takes up a small slice of your router’s capacity. In a household with a dozen or more smart devices, that adds up. Log into your router’s admin panel and check the connected device list; it’s common to find forgotten devices still eating bandwidth. Disconnecting anything that isn’t essential frees up capacity for what matters.
7. Use Quality of Service (QoS) Settings
Most modern routers include a QoS feature that lets you prioritize certain types of traffic. If video calls keep freezing while someone else games or streams in 4K, QoS settings let you assign higher priority to the traffic that actually needs it. This isn’t a fix for weak signal exactly, but it makes a mediocre signal feel far more usable, and it’s free to configure.
8. Hardwire What You Can
Not every device needs to be wireless. Smart TVs, gaming consoles, and desktop computers that stay in one place are good candidates for a direct Ethernet connection, which sidesteps signal issues entirely and frees up wireless bandwidth for devices that need to be mobile. If running a cable isn’t realistic, a powerline adapter is a reasonable middle ground, using your home’s existing electrical wiring to carry a connection between rooms.
9. Upgrade to a Mesh Wi-Fi System
If you’ve tried repositioning, channel changes, and firmware updates and you’re still fighting dead zones, the underlying problem is likely that a single router cannot cover your home’s layout, and no amount of tweaking will change that.
Mesh systems solve this by placing multiple connected nodes throughout the house, each extending coverage without the signal degradation traditional range extenders are known for. Devices automatically connect to whichever node is strongest, giving consistent coverage as you move from room to room.
Wi-Fi extender vs. mesh system:
| Range Extender | Mesh System | |
| Setup | Simple, plug-and-play | Slightly more involved, usually app-guided |
| Cost | Lower, often $30 to $80 | Higher, typically $150 to $400+ for a multi-node kit |
| Network name | Often creates a separate network | Single network name throughout the home |
| Roaming | Manual, devices don’t switch automatically | Seamless, devices hop to the strongest node |
| Best for | Small homes, one specific dead zone | Larger or multi-story homes with several weak spots |
Mesh systems aren’t cheap, and if your issue is a single dead zone in an otherwise fine network, a $40 extender might solve it without the bigger investment. It genuinely depends on how widespread the problem is.
10. Consider Your Wall Materials
Not all walls are created equal when it comes to blocking Wi-Fi. Drywall and wood barely slow a signal down, but concrete, brick, and anything with metal reinforcement absorb or reflect a meaningful amount of it. If your dead zone happens to be on the other side of a load-bearing concrete wall or near a metal appliance like a refrigerator, that’s very likely the actual culprit, not your router’s age or your ISP plan. No amount of channel switching will fully compensate here; a mesh node placed on the far side of that wall is the more reliable fix.
11. Secure Your Network
A crowded network isn’t always crowded with your own devices. If your Wi-Fi password is weak or your network is still using an outdated security protocol, neighbors can quietly eat into your bandwidth without you ever noticing. Use WPA3 encryption if your router supports it (WPA2 as a minimum), and set a password that isn’t easily guessable. Boosting your router’s transmit power can extend your usable range but also extends your network’s reach beyond your own walls, so pair any power increase with solid password security.
12. Know When It’s Time for a New Router
If your router is more than five or six years old, it may simply be outmatched by how many devices the average home now pushes through it. Older routers often lack support for newer standards like Wi-Fi 6 or 6E, which handle multiple simultaneous connections far more gracefully. This is the least glamorous fix on the list, but the most honest one: sometimes the router isn’t broken, it’s just old.
Budget-Based Fixes: What to Try First
Not everyone wants to spend money to fix a Wi-Fi problem, and honestly, most people don’t need to. Here’s a rough breakdown by cost:
- Free: Router repositioning, channel switching, firmware updates, disconnecting unused devices, QoS configuration
- Under $50: A basic Wi-Fi range extender, a powerline adapter starter kit, a Wi-Fi analyzer app (most are free anyway)
- $100 and up: A mesh Wi-Fi system, a new dual-band or tri-band router, running Ethernet cable through walls
Start at the top of that list. It’s genuinely rare that a Wi-Fi problem requires new hardware.
Apartment and Renter-Specific Tips
If you’re renting, some of the usual advice doesn’t apply. You probably can’t run Ethernet through walls or mount an antenna, and you’re sharing airspace with a dozen other networks in the building. Prioritize channel selection first, since congestion from neighboring units is usually the biggest factor. A small, portable mesh kit (two nodes instead of a full house system) often works better than a single extender in a railroad-style layout, and keeping the router near the center of your unit rather than an exterior wall stops half your signal from broadcasting outside where it’s wasted.
Read More: https://buzzonik.com/what-causes-a-stroke/
FAQs
Why is my Wi-Fi signal so weak in certain rooms?
Usually it comes down to distance from the router combined with physical obstructions like walls, floors, or large appliances between you and the access point. Interference from other devices or a congested channel can make it worse.
Does aluminum foil actually boost Wi-Fi signal?
Not reliably. It can redirect signal in one direction if shaped and positioned carefully, but it’s just as likely to block or scatter the signal instead. A proper reflector or, better yet, a mesh node, is a far more consistent solution.
How can I check my Wi-Fi signal strength?
Most phones show signal strength as bars in the Wi-Fi settings menu, but a free Wi-Fi analyzer app gives a much clearer picture, including signal strength in dBm and which channels are congested nearby.
Is mesh Wi-Fi better than a range extender?
For larger homes or multiple dead zones, generally yes, since mesh systems maintain a single network name and let devices roam seamlessly between nodes. For a single small dead zone, a range extender is usually cheaper and sufficient.
Can too many connected devices slow down my Wi-Fi?
Yes. Every connected device uses a share of your router’s available capacity, and older or budget routers in particular can struggle once a household has fifteen or more devices connected at once.
Does Wi-Fi go through walls?
Yes, but with real limits. Lighter materials like drywall and wood let signal pass through fairly easily, while concrete, brick, and metal significantly weaken or block it.
Is 5GHz or 2.4GHz better for a stronger signal?
Neither is universally “better.” 2.4GHz travels farther and penetrates walls more effectively but is slower and more prone to interference. 5GHz is faster with less interference but has a shorter effective range.
How do I change my Wi-Fi channel?
Log into your router’s admin interface (usually through a browser at an address like 192.168.1.1), find the wireless settings, and switch the channel setting from automatic to a manually selected, less congested option, typically 1, 6, or 11 for 2.4GHz.
Final Thoughts
Improving your Wi-Fi signal rarely requires an expensive overhaul. Most homes see a real, noticeable difference just from moving the router to a better spot, switching to a clearer channel, and clearing out interference from nearby devices, all of which cost nothing. When those steps aren’t enough, particularly in larger or multi-story homes, a mesh system tends to solve what a single router structurally cannot.
There’s no single fix that works for every home, because the cause of weak Wi-Fi is different in every home. Start with the free changes, test your signal in the rooms that matter before and after each one, and only reach for new hardware once you’ve ruled out what costs nothing. If you’ve worked through this list and you’re still stuck, the router’s age or your home’s layout is likely the real bottleneck, worth knowing before you spend money guessing.

